Friday, May 22, 2015

Rainbow Road, My Hardest Centerpiece


One of my original centerpiece ideas was the rainbow road in Mario Kart. I used to spend hours on this map, speeding as fast as I could and constantly falling over the edge. Although Ben didn't play this map, I was obsessed with the idea of making this centerpiece work.

First of all, I spent so much more money than I wanted to for this centerpiece. My first purchase was the road. I wanted lots of bling for this centerpiece. So I googled and googled for ideas until I came across these flatback beads on ebay.


There were a couple of variations in size so I thought about it for a couple of days. I didn't want to sit on it long though because these were from China and from experience, I knew that it could take a while to receive. I printed out life-sized pieces and started formed a circle to see if I liked the size and how many pieces I would need.
I determined that I liked the 8mm x 8mm beads and got six colors. They came in bags of 200 each so I had more than enough although the beads alone were already a little over $20. Not bad considering I got about 1200 beads though.

Next was the figurines. I was too lazy to make Mario Kart cars so I searched on ebay until I found some very tiny figurines. I came across this set of 10 that were 5-6cm each. I took the chance that they were small enough and that I could rip the character off some of the cars. Luckily, I was able to for two of them, which was enough for me.  That was another $20 gone.


The hardest part (and my failed part) was how to assemble the road. I started with some grand idea that I would have a floating, twisted road that was held in the air by some sort of legs. Here's my rough draft of it:
Please excuse the child-like doodling. This is the best I can represent my dream since I was far from achieving it.

I had hoped to have it floating in the air like the game and even hoped to add the little turtle cloud guy that fishes you back onto the road after you fell off. I tried manipulating a wreath wire to no prevail. I tried using plaster mix but failed at that too. I also failed to figure out what I could use as legs. I had spent a lot of money on failed attempts but I was running out of time.

In the end, I opted for the easy way out. I planned out a simple oval road and glued the beads onto paper. It wasn't what I had envisioned but at least I was still able to present a centerpiece that was relatively close.

To add to the effect, I made some clay items like the black bomb guard and a turtle shell. It wasn't as grand as I hoped but I think people were still impressed. 


From our amazing photographer Christopher Kim


Thursday, May 21, 2015

Not enough time

Too many ideas... not enough time to implement!

I was going to do video game cartridges of classic games converted to Ben and Doe characters... =[
I only had time to create this one though...


Tuesday, May 19, 2015

That's not wood?!


I was super excited when I accidentally created these awesome "wood" separators.


I needed something to separate my Lindt truffle favors. Initially I was going to use woven tray and a paper separator (see left) but I realized I needed a deeper tray for all my Lindt. That meant I needed a taller/sturdier separater (plus this paper one looks really ghetto).


I had some leftover foamboard from my photobooth faces so I decided to use that. I measured my basket and carved out the slots.

At first I left them as white but it looked so ugly so I took some brown paint and just dry painted them with these sponge brushes. By "dry paint", I mean I slathered the brown paint on a plate (no water added) and I used the sponge brush and only brushed in one direction (up and down). That way, you get those streaks that look like wood grains. By going over certain areas a 2nd time, you get that aged wood look. 

FYI, THESE FOAM BOARDS HAD A PAPER BACKING. I doubt this works for the foam boards that are shiny/slippery.

I forgot to take a picture of the before picture but in this picture, you can see that the middle is still white. No one knew these weren't wood until I told them!

The finished product looks really classy and it was very sturdy!

Monday, May 18, 2015

Photobooth Prop - Giant Faces

One of the favorite props on our wedding night was our giant faces. Everyone loved them!
Chris Kim Photography


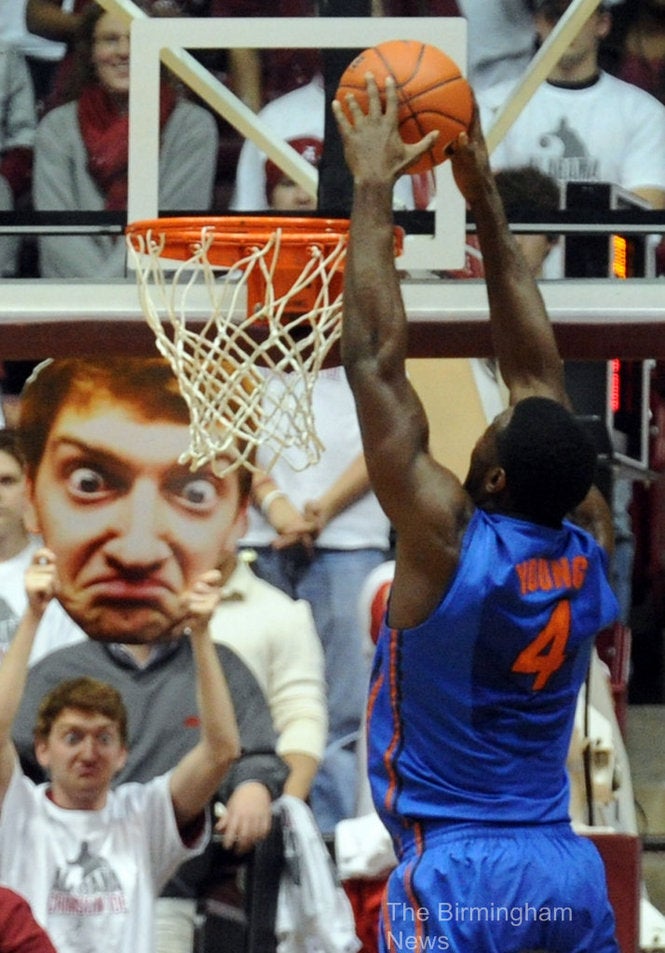
Ben wanted a big poster of us and I wanted the funny face
like that one guy who brings his own face to basketball games.
I always thought it was hilarious.


It's not TOO hard to pull off.

  1. First, use a really good camera and set it to your highest resolution. The best option is to put it on a tripod so that you can take clear images. Use either a 2nd person to take the pictures or the timer. A 2nd person would be best because you can just stand there and make multiple faces without moving. That will make things easier later when you're choosing your photos/expressions.
  2. If you want to do it the easy way, you can glue one facial expression per poster board. Just follow steps 4-6 from here.
  3. If you want to do it the tricky way... You can put a 2nd facial expression on the other side of the poster board. That way, you can carry one poster board and flip over to display the expression you want. In order to do this, you have to make sure that you size both faces the same and that the reflection is the same shape.

    These are the two sides I choose for Ben's face

    On side 1, I outlined his face in Photoshop

    I reflected the outline and place it over Face 2 to make sure it was the same shape

    Make sure that each face is the same size! You may need to photoshop the face a little to fill up the space. It's okay if the space outside the outline goes past (see how Ben's hair goes past the outline? That's perfect!). You just want to make sure that when you cut out the face, you don't have white space (inside the outline).

  4. I printed the posters at Walmart for super cheap (do not print the red face outline, that was just a reference to show you). The size will depend on how large you want the face and the size of your poster foamboard. I went with a 20" x 30" poster for each face.

  5. Use an adhesive spray and slap on the first poster. (TIP 1: Use LOTS of adhesive. My faces started to peel off by the end of the wedding night... and TIP 2: adhesive spray gets EVERYWHERE. If you don't want sticky floors, line the surrounding area with newspaper or spray it outside on the grass.)

  6. Cut out the first face from the poster board using a blade. I just bought this FoamWerks Freestyle Cutter and thought it worked really well. Go slow so that you don't slip and cut off more than you want. You don't need to press down or anything either. I found that it moves rather easily if you just guide it and I chipped the bottom of the blade because I was putting too much strength into it. ALWAYS CUT WITH AN EXTRA FOAM BOARD UNDER YOUR PIECE. You don't want to be cutting up your floor or table!

  7. When you have your first face cut out, just line the cutout against Poster 2 and try to align it. You may have to hold it up so that you can see through the poster and guess where the face is. Trace out the shape on the poster and you can cut it out with regular scissors. Then just use adhesive spray again and line it up!


The best part about this prop is that it's a great substitute for the bride/groom. We had to disappear multiple times to greet people or to take pictures so one of our regrets was that we weren't able to take photobooth pictures with people. But now I'm looking through our images and it almost feels like we were there because people loved bringing our faces into the photobooth!