Tuesday, July 28, 2015

Japanese Cheesecake Attempt #1

Yesterday I tried to make Japanese Cheesecake from this recipe.
I crossed out my alterations for this round below.

Ingredients:
140g/5 oz. fine granulated sugar
6 egg whites
6 egg yolks
1/4 teaspoon cream of tartar
50g/2 oz. unsalted butter
250g/9 oz. cream cheese 8 oz. cream cheese (I only had one box)
100 ml/3 fluid oz. fresh milk
1 tablespoon lemon juice  I didn't have any lemons so I didn't put any in
60g/2 oz. cake flour /superfine flour
20g/1 oz. cornflour (cornstarch)
1/4 teaspoon salt
Method:
1. Melt cream cheese, butter and milk over a double boiler. Cool the mixture. Fold in the flour, the cornflour, salt, egg yolks, lemon juice and mix well.
2. Make the meringue by whisking egg whites with cream of tartar until foamy. You can beat with a stand mixer or handheld mixer. Add in the sugar and whisk until soft peaks form. 
3. Take 1/3 meringue and fold into the cheese mixture, then fold in another 1/3 of meringue. After incorporated, pour the batter back to the remaining 1/3 meringue and fold. FOLD GENTLY. Pour the mixture into a 8-inch round cake pan (lightly grease and line the bottom and sides of the pan with grease-proof baking paper or parchment paper).
4. Bake cheesecake in a water bath for 1 hours 10 minutes or until set and golden brown at 160 degrees C (325 degrees F).

First Attempt:
  • I didn't get an extra cream cheese so I only used 8oz instead of 9oz of cream cheese
  • I forgot to get lemon so I didn't use lemon juice
  • I misunderstood the instructions so I double lined the inside with parchment paper. Since parchment paper is not that flexible, I got a slightly weird shape on the outside. Not a big deal.
  • I forgot to research water bath before I started so I just placed a pan filled with water on the rack under my cheesecake (instead of half submerging the cheesecake pan in hot water like you're supposed to). The cheesecake cooked well and there was no cracks although I wonder if this is why my result was a bit more condensed and less fluffy?

    LOL. If you look at my picture, I got paranoid that my water bath was too much of a failure so I took the cheesecake out after about 20 minutes, and wrapped the bottom in foil in an attempt to do the water bath correctly (place it in a bigger pan and fill with hot water halfway). Then I realized that I don't have a pan large enough to submerge my cheesecake pan so I had to put it back in the oven.

The outcome looked beautiful. I tasted a small, outer piece after it cooled from the oven and thought it was great. I put the cake in tupperware and let it cool in the fridge overnight and tried again in the morning. It felt harder and a little drier although I'm not sure if this is because I ate further into the cake or because of the fridge.

Outcome:
  • It feels a bit fluffier on the top and a bit condensed on the bottom.
  • The best part is the top with a slight sweetness to the browned part
  • It left a very slight rough taste in my mouth (kind of like when you eat spinach). It went away quickly but I felt it.
  • Not much flavor although coworker says he can taste the cream cheese
  • *UPDATE* The more I try it, the more I like it... if that makes any sense. =P
Adjustments for next time:
  • Use a larger pan so that it's shorter and has more top surface. Or make in mini cups.
  • Add the extra 1oz cream cheese for the taste
  • Add the lemon juice for some extra flavor
  • Do the water bath right 
  • (optional) try to make some sort of cream cheese frosting?

Friday, May 22, 2015

Rainbow Road, My Hardest Centerpiece


One of my original centerpiece ideas was the rainbow road in Mario Kart. I used to spend hours on this map, speeding as fast as I could and constantly falling over the edge. Although Ben didn't play this map, I was obsessed with the idea of making this centerpiece work.

First of all, I spent so much more money than I wanted to for this centerpiece. My first purchase was the road. I wanted lots of bling for this centerpiece. So I googled and googled for ideas until I came across these flatback beads on ebay.


There were a couple of variations in size so I thought about it for a couple of days. I didn't want to sit on it long though because these were from China and from experience, I knew that it could take a while to receive. I printed out life-sized pieces and started formed a circle to see if I liked the size and how many pieces I would need.
I determined that I liked the 8mm x 8mm beads and got six colors. They came in bags of 200 each so I had more than enough although the beads alone were already a little over $20. Not bad considering I got about 1200 beads though.

Next was the figurines. I was too lazy to make Mario Kart cars so I searched on ebay until I found some very tiny figurines. I came across this set of 10 that were 5-6cm each. I took the chance that they were small enough and that I could rip the character off some of the cars. Luckily, I was able to for two of them, which was enough for me.  That was another $20 gone.


The hardest part (and my failed part) was how to assemble the road. I started with some grand idea that I would have a floating, twisted road that was held in the air by some sort of legs. Here's my rough draft of it:
Please excuse the child-like doodling. This is the best I can represent my dream since I was far from achieving it.

I had hoped to have it floating in the air like the game and even hoped to add the little turtle cloud guy that fishes you back onto the road after you fell off. I tried manipulating a wreath wire to no prevail. I tried using plaster mix but failed at that too. I also failed to figure out what I could use as legs. I had spent a lot of money on failed attempts but I was running out of time.

In the end, I opted for the easy way out. I planned out a simple oval road and glued the beads onto paper. It wasn't what I had envisioned but at least I was still able to present a centerpiece that was relatively close.

To add to the effect, I made some clay items like the black bomb guard and a turtle shell. It wasn't as grand as I hoped but I think people were still impressed. 


From our amazing photographer Christopher Kim


Thursday, May 21, 2015

Not enough time

Too many ideas... not enough time to implement!

I was going to do video game cartridges of classic games converted to Ben and Doe characters... =[
I only had time to create this one though...


Tuesday, May 19, 2015

That's not wood?!


I was super excited when I accidentally created these awesome "wood" separators.


I needed something to separate my Lindt truffle favors. Initially I was going to use woven tray and a paper separator (see left) but I realized I needed a deeper tray for all my Lindt. That meant I needed a taller/sturdier separater (plus this paper one looks really ghetto).


I had some leftover foamboard from my photobooth faces so I decided to use that. I measured my basket and carved out the slots.

At first I left them as white but it looked so ugly so I took some brown paint and just dry painted them with these sponge brushes. By "dry paint", I mean I slathered the brown paint on a plate (no water added) and I used the sponge brush and only brushed in one direction (up and down). That way, you get those streaks that look like wood grains. By going over certain areas a 2nd time, you get that aged wood look. 

FYI, THESE FOAM BOARDS HAD A PAPER BACKING. I doubt this works for the foam boards that are shiny/slippery.

I forgot to take a picture of the before picture but in this picture, you can see that the middle is still white. No one knew these weren't wood until I told them!

The finished product looks really classy and it was very sturdy!

Monday, May 18, 2015

Photobooth Prop - Giant Faces

One of the favorite props on our wedding night was our giant faces. Everyone loved them!
Chris Kim Photography


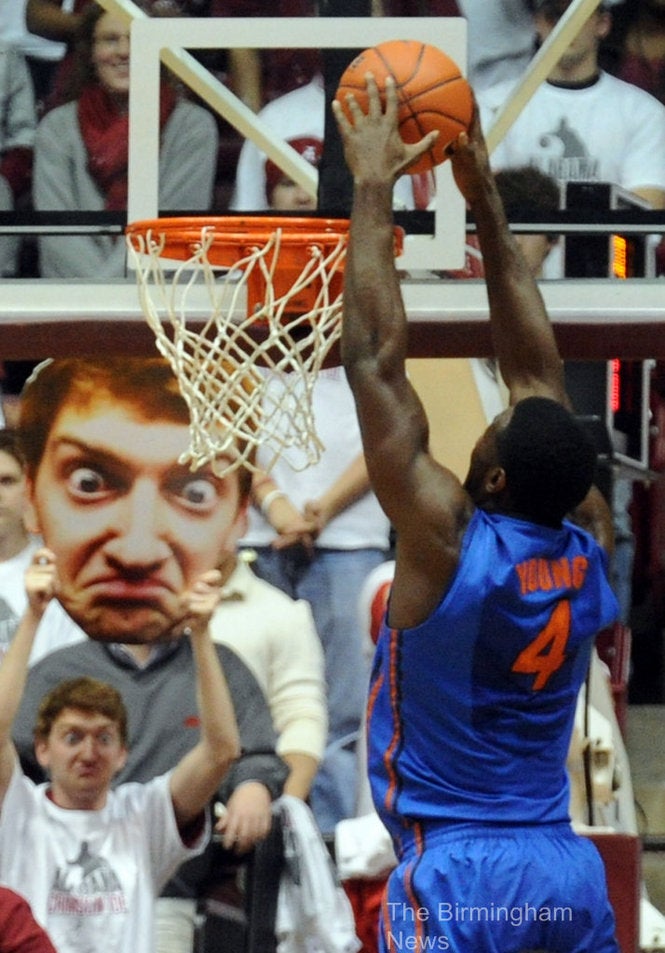
Ben wanted a big poster of us and I wanted the funny face
like that one guy who brings his own face to basketball games.
I always thought it was hilarious.


It's not TOO hard to pull off.

  1. First, use a really good camera and set it to your highest resolution. The best option is to put it on a tripod so that you can take clear images. Use either a 2nd person to take the pictures or the timer. A 2nd person would be best because you can just stand there and make multiple faces without moving. That will make things easier later when you're choosing your photos/expressions.
  2. If you want to do it the easy way, you can glue one facial expression per poster board. Just follow steps 4-6 from here.
  3. If you want to do it the tricky way... You can put a 2nd facial expression on the other side of the poster board. That way, you can carry one poster board and flip over to display the expression you want. In order to do this, you have to make sure that you size both faces the same and that the reflection is the same shape.

    These are the two sides I choose for Ben's face

    On side 1, I outlined his face in Photoshop

    I reflected the outline and place it over Face 2 to make sure it was the same shape

    Make sure that each face is the same size! You may need to photoshop the face a little to fill up the space. It's okay if the space outside the outline goes past (see how Ben's hair goes past the outline? That's perfect!). You just want to make sure that when you cut out the face, you don't have white space (inside the outline).

  4. I printed the posters at Walmart for super cheap (do not print the red face outline, that was just a reference to show you). The size will depend on how large you want the face and the size of your poster foamboard. I went with a 20" x 30" poster for each face.

  5. Use an adhesive spray and slap on the first poster. (TIP 1: Use LOTS of adhesive. My faces started to peel off by the end of the wedding night... and TIP 2: adhesive spray gets EVERYWHERE. If you don't want sticky floors, line the surrounding area with newspaper or spray it outside on the grass.)

  6. Cut out the first face from the poster board using a blade. I just bought this FoamWerks Freestyle Cutter and thought it worked really well. Go slow so that you don't slip and cut off more than you want. You don't need to press down or anything either. I found that it moves rather easily if you just guide it and I chipped the bottom of the blade because I was putting too much strength into it. ALWAYS CUT WITH AN EXTRA FOAM BOARD UNDER YOUR PIECE. You don't want to be cutting up your floor or table!

  7. When you have your first face cut out, just line the cutout against Poster 2 and try to align it. You may have to hold it up so that you can see through the poster and guess where the face is. Trace out the shape on the poster and you can cut it out with regular scissors. Then just use adhesive spray again and line it up!


The best part about this prop is that it's a great substitute for the bride/groom. We had to disappear multiple times to greet people or to take pictures so one of our regrets was that we weren't able to take photobooth pictures with people. But now I'm looking through our images and it almost feels like we were there because people loved bringing our faces into the photobooth!


Saturday, April 18, 2015

Custom Couple Topper

For a cake topper, I made a custom clay topper.

To start, plan out the colors that you'll need. These are the colors that I chose:

- Peach (skin)
- Grey (Ben's shirt)
- Blue (Doe's shirt)
- Black (Ben's hair)
- Brown (Doe's hair)
- Red (Ben's hat)
To save money and time, try to go to an art supply store when there's a coupon for your entire purchase (usually around 20% off your entire purchase). Otherwise you can go in once a day and use the 40% off one item coupon but who has the time and patience for that?!


Start with 4 even balls like this:


Flatten the bottom of the shirts and shape them so that it can act as an anchor. To connect the head, I stuck a half toothpick in there so that I can just slide it on top.


For Ben's hair, I cut his bangs in the front and then when you wrap it around the head, you'll need to cut the excess off so that you can smooth it out.


For Doe's hair, I flattened out the brown clay and cut some smooth edges in the front. I didn't cut off the excess in the back because I scrunched it together to create a "curly" hair look.


Once you bake it for the time stated on the clay, let it cool completely and then you can draw the face on! I used sharpies and white out. It draws nicely.

I baked the characters first and then added Ben's red hat. It's a little harder to make the red stick but it'll save some headaches. The reason being that light colored clay will grab darker colors easily and you'll get a tainted/mixed look. Always clean your hands between working with each color! In my first go, the skin started picking up the red clay and I got a swirly skin color that looked strange.

They turned out well and I'm very happy with them! If you're too lazy, I'm sure you can find an etsy artist that will make something like it for you!

Companion Cube Centerpiece

Ben suddenly started asking what centerpiece we would have at our sweetheart table. I planned on just sticking my bouquet there but he kept insisting on something there. Then he suggested Companion Cube and kept googling. I didn't want to spend $40 on some cheap looking box so I decided to copy a perler version we saw online. For those of you that aren't aware of Companion Cube, it's a prop that is used in the game Portal 2.
Image from http://eat3d.com/


I decided to make a 4-sided piece to place over a vase. My florist said that a 8-12" vase would work for my bouquet. I purchased an 8" vase but I didn't want to make a huge Companion Cube so I opted for a 5.5" Companion Cube. Well, let's be honest... I didn't want to spend the extra time and money (for beads) to make an 8" Companion Cube. =[

Anyway... Companion Cube has 4 colors (black, grey, white, magenta) so I bought them online. They are about $5 each color for about 1,000 beads on Amazon but that will depend on how big your companion cube will be. I ended up needing more white and grey perler beads so plan ahead of time so that you have time to buy more. If you don't have a perler pegboard, you'll want to get one. (I did spend an extra $5 on an assortment because I wanted some clear beads. I'll explain why later.)

It takes a bit of time and patience but it's pretty easy. Just carefully plan out your design. And remember to up look and stretch often. Once you get into it, you don't even realize how long you've been leaning over this piece!


Once you have it all set, you place the paper (included with the pegboard or I heard that parchment paper works) on top of it and slowly iron your piece. Be careful not to stay too long in one spot because the beads will start to melt and if it's not even, it'll look like this...

Slowly feel off the paper and make sure that all the pieces are melted together. If they are, then take the piece off the board and flip it around and repeat.

Once both sides are pretty blended, take the piece and place it on a hard surface and place a heavy book on top to keep it flat. If it's really hot, make sure to put it on something that is resistant to heat. Wait until it cools completely.


If you're connecting them, make sure to plan out the "puzzle" pieces. I left the black off one side and added these extra clear beads so that they "connect". (I got an assortment of perler bead colors so that I could use these clear ones and have other colors for any future projects)


If you flattened them well, they should connect nicely together. Due to my Coordinator handling Companion Cube for me, I decided to just hot glue the inside so that it would stay put.